The documentation you are viewing is for Dapr v1.15 which is an older version of Dapr. For up-to-date documentation, see the latest version.
快速入门:Actors
我们来了解一下 Dapr 的 Actors 构建模块。在这个快速入门中,您将运行一个智能设备微服务和一个简单的控制台客户端,以演示 Dapr Actors 中的有状态对象模式。
目前,您可以通过 .NET SDK 体验这个 actors 快速入门。
以下是 .NET actors 快速入门的简要概述:
- 使用
SmartDevice.Service微服务,您将托管:- 两个
SmokeDetectorActor烟雾报警对象 - 一个
ControllerActor对象,用于指挥和控制智能设备
- 两个
- 使用
SmartDevice.Client控制台应用程序,客户端应用程序与每个 actor 或控制器交互,以执行聚合操作。 SmartDevice.Interfaces包含服务和客户端应用程序使用的共享接口和数据类型。

先决条件
对于这个示例,您将需要:
注意: .NET 6 是此版本中 Dapr .NET SDK 包的最低支持版本。只有 .NET 8 和 .NET 9 将在 Dapr v1.16 及更高版本中得到支持。
步骤 1:设置环境
git clone https://github.com/dapr/quickstarts.git
步骤 2:运行服务应用程序
在一个新的终端窗口中,导航到 actors/csharp/sdk/service 目录并恢复依赖项:
cd actors/csharp/sdk/service
dotnet build
运行 SmartDevice.Service,这将启动服务本身和 Dapr 边车:
dapr run --app-id actorservice --app-port 5001 --dapr-http-port 3500 --resources-path ../../../resources -- dotnet run --urls=http://localhost:5001/
预期输出:
== APP == info: Microsoft.AspNetCore.Hosting.Diagnostics[1]
== APP ==       Request starting HTTP/1.1 GET http://127.0.0.1:5001/healthz - -
== APP == info: Microsoft.AspNetCore.Routing.EndpointMiddleware[0]
== APP ==       Executing endpoint 'Dapr Actors Health Check'
== APP == info: Microsoft.AspNetCore.Routing.EndpointMiddleware[1]
== APP ==       Executed endpoint 'Dapr Actors Health Check'
== APP == info: Microsoft.AspNetCore.Hosting.Diagnostics[2]
== APP ==       Request finished HTTP/1.1 GET http://127.0.0.1:5001/healthz - - - 200 - text/plain 5.2599ms
步骤 3:运行客户端应用程序
在一个新的终端实例中,导航到 actors/csharp/sdk/client 目录并安装依赖项:
cd ./actors/csharp/sdk/client
dotnet build
运行 SmartDevice.Client 应用程序:
dapr run --app-id actorclient -- dotnet run
预期输出:
== APP == Startup up...
== APP == Calling SetDataAsync on SmokeDetectorActor:1...
== APP == Got response: Success
== APP == Calling GetDataAsync on SmokeDetectorActor:1...
== APP == Device 1 state: Location: First Floor, Status: Ready
== APP == Calling SetDataAsync on SmokeDetectorActor:2...
== APP == Got response: Success
== APP == Calling GetDataAsync on SmokeDetectorActor:2...
== APP == Device 2 state: Location: Second Floor, Status: Ready
== APP == Registering the IDs of both Devices...
== APP == Registered devices: 1, 2
== APP == Detecting smoke on Device 1...
== APP == Device 1 state: Location: First Floor, Status: Alarm
== APP == Device 2 state: Location: Second Floor, Status: Alarm
== APP == Sleeping for 16 seconds before checking status again to see reminders fire and clear alarms
== APP == Device 1 state: Location: First Floor, Status: Ready
== APP == Device 2 state: Location: Second Floor, Status: Ready
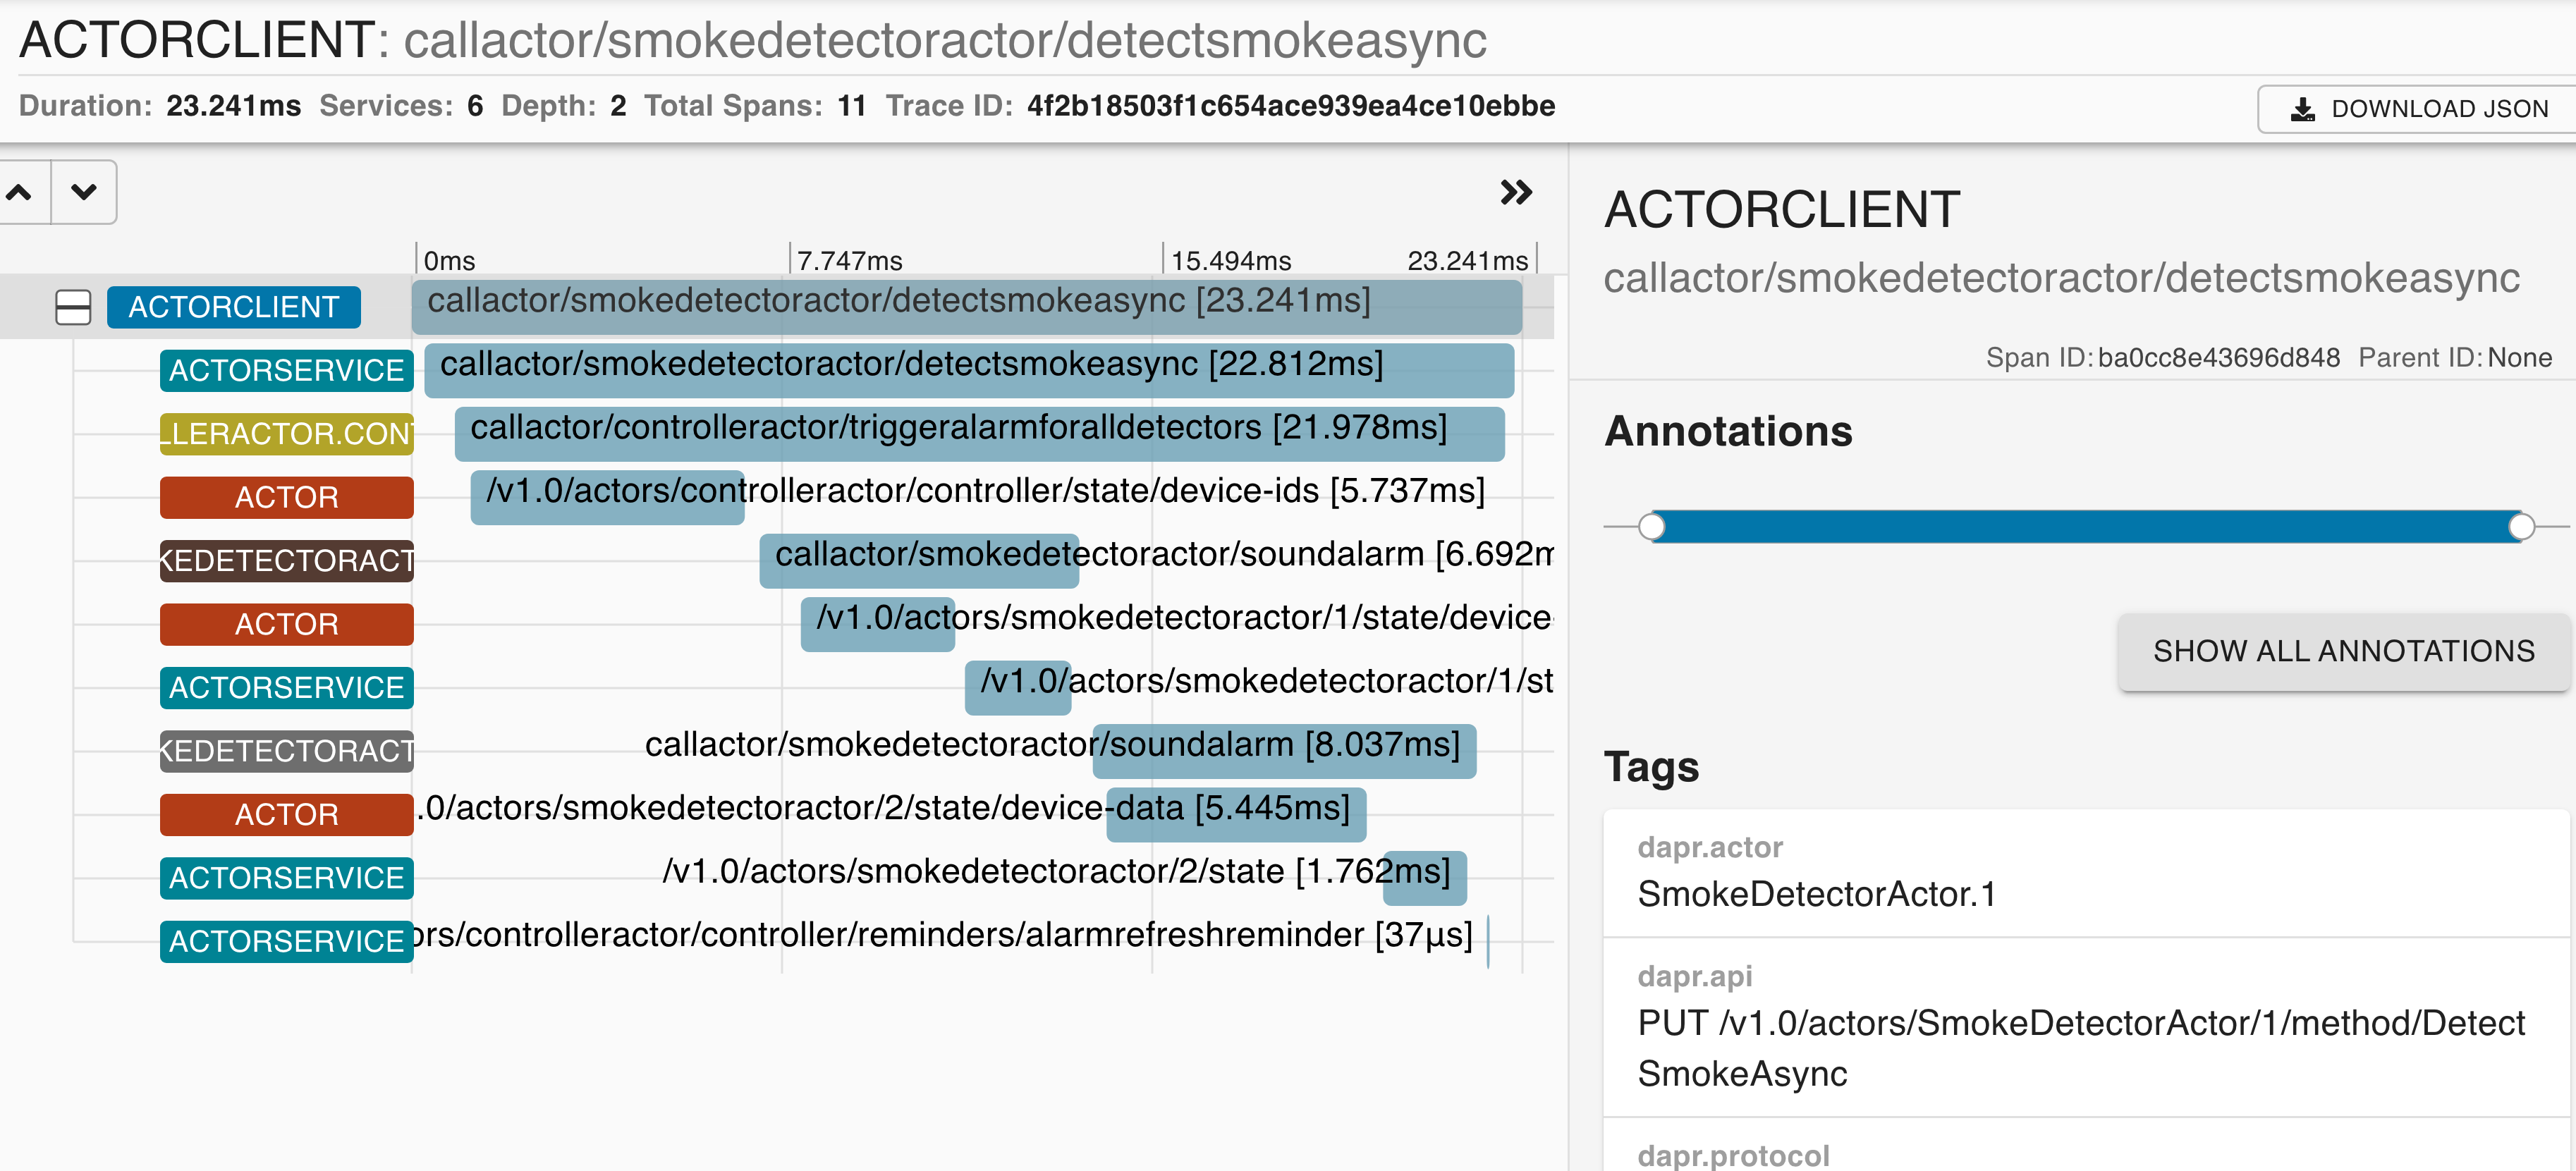
(可选)步骤 4:在 Zipkin 中查看
如果您在本地机器上为 Dapr 配置了 Zipkin,您可以在 Zipkin Web UI 中查看 actor 与客户端的交互(通常在 http://localhost:9411/zipkin/)。
发生了什么?
当您运行客户端应用程序时,发生了一些事情:
-
两个
SmokeDetectorActoractors 在 客户端应用程序中创建 并使用对象状态初始化:ActorProxy.Create<ISmartDevice>(actorId, actorType)proxySmartDevice.SetDataAsync(data)
这些对象是可重入的并持有状态,如
proxySmartDevice.GetDataAsync()所示。// Actor Ids 和类型 var deviceId1 = "1"; var deviceId2 = "2"; var smokeDetectorActorType = "SmokeDetectorActor"; var controllerActorType = "ControllerActor"; Console.WriteLine("Startup up..."); // ActorId 唯一标识第一个设备的第一个 actor 实例 var deviceActorId1 = new ActorId(deviceId1); // 创建将存储在第一个 actor 中的数据类的新实例 var deviceData1 = new SmartDeviceData(){ Location = "First Floor", Status = "Ready", }; // 使用服务实现的相同接口创建本地代理。 var proxySmartDevice1 = ActorProxy.Create<ISmartDevice>(deviceActorId1, smokeDetectorActorType); // 现在您可以使用 actor 接口调用 actor 的方法。 Console.WriteLine($"Calling SetDataAsync on {smokeDetectorActorType}:{deviceActorId1}..."); var setDataResponse1 = await proxySmartDevice1.SetDataAsync(deviceData1); Console.WriteLine($"Got response: {setDataResponse1}"); Console.WriteLine($"Calling GetDataAsync on {smokeDetectorActorType}:{deviceActorId1}..."); var storedDeviceData1 = await proxySmartDevice1.GetDataAsync(); Console.WriteLine($"Device 1 state: {storedDeviceData1}"); // 为第二个设备创建第二个 actor var deviceActorId2 = new ActorId(deviceId2); // 创建将存储在第一个 actor 中的数据类的新实例 var deviceData2 = new SmartDeviceData(){ Location = "Second Floor", Status = "Ready", }; // 使用服务实现的相同接口创建本地代理。 var proxySmartDevice2 = ActorProxy.Create<ISmartDevice>(deviceActorId2, smokeDetectorActorType); // 现在您可以使用 actor 接口调用第二个 actor 的方法。 Console.WriteLine($"Calling SetDataAsync on {smokeDetectorActorType}:{deviceActorId2}..."); var setDataResponse2 = await proxySmartDevice2.SetDataAsync(deviceData2); Console.WriteLine($"Got response: {setDataResponse2}"); Console.WriteLine($"Calling GetDataAsync on {smokeDetectorActorType}:{deviceActorId2}..."); var storedDeviceData2 = await proxySmartDevice2.GetDataAsync(); Console.WriteLine($"Device 2 state: {storedDeviceData2}"); -
SmokeDetectorActor 1的DetectSmokeAsync方法被调用。public async Task DetectSmokeAsync() { var controllerActorId = new ActorId("controller"); var controllerActorType = "ControllerActor"; var controllerProxy = ProxyFactory.CreateActorProxy<IController>(controllerActorId, controllerActorType); await controllerProxy.TriggerAlarmForAllDetectors(); } -
ControllerActor的TriggerAlarmForAllDetectors方法被调用。当检测到烟雾时,ControllerActor内部触发所有警报public async Task TriggerAlarmForAllDetectors() { var deviceIds = await ListRegisteredDeviceIdsAsync(); foreach (var deviceId in deviceIds) { var actorId = new ActorId(deviceId); var proxySmartDevice = ProxyFactory.CreateActorProxy<ISmartDevice>(actorId, "SmokeDetectorActor"); await proxySmartDevice.SoundAlarm(); } // 注册一个提醒,每 15 秒刷新并清除警报状态 await this.RegisterReminderAsync("AlarmRefreshReminder", null, TimeSpan.FromSeconds(15), TimeSpan.FromSeconds(15)); }控制台 打印一条消息,指示检测到烟雾。
// 在设备 1 上检测到烟雾,触发所有设备的警报。 Console.WriteLine($"Detecting smoke on Device 1..."); proxySmartDevice1 = ActorProxy.Create<ISmartDevice>(deviceActorId1, smokeDetectorActorType); await proxySmartDevice1.DetectSmokeAsync(); -
SmokeDetectorActor 1和2的SoundAlarm方法 被调用。storedDeviceData1 = await proxySmartDevice1.GetDataAsync(); Console.WriteLine($"Device 1 state: {storedDeviceData1}"); storedDeviceData2 = await proxySmartDevice2.GetDataAsync(); Console.WriteLine($"Device 2 state: {storedDeviceData2}"); -
ControllerActor还使用RegisterReminderAsync创建一个持久提醒,在 15 秒后调用ClearAlarm。// 注册一个提醒,每 15 秒刷新并清除警报状态 await this.RegisterReminderAsync("AlarmRefreshReminder", null, TimeSpan.FromSeconds(15), TimeSpan.FromSeconds(15));
要了解示例的完整上下文,请查看以下代码:
SmokeDetectorActor.cs:实现智能设备 actorsControllerActor.cs:实现管理所有设备的控制器 actorISmartDevice:每个SmokeDetectorActor的方法定义和共享数据类型IController:ControllerActor的方法定义和共享数据类型
告诉我们您的想法!
我们正在不断努力改进我们的快速入门示例,并重视您的反馈。您觉得这个快速入门有帮助吗?您有改进的建议吗?
加入我们的 discord 频道 讨论。
下一步
了解更多关于 Actor 构建模块 的信息
探索 Dapr 教程 >>Feedback
Was this page helpful?
Glad to hear it! Please tell us how we can improve.
Sorry to hear that. Please tell us how we can improve.